5 Ways to Identify Demo Visitors without a Form

An overwhelming majority of marketers opt for ungated product tours.
According to our State of the Interactive Product Demo 2025 research, ~70% of the top 1% of interactive demos did not begin with a form gate.
That stat has hovered around 70% for the past two years, likely because ungated demos have a 10% higher engagement rate than gated demos.
While that’s a win for buyers, sales teams may feel otherwise. How do they know who to nurture?
Below, we share a few different ways to track and personalize demos without a gate, outlining when to use them and how to put them into practice.
5 Ways to Identify and Nurture Prospects Without a Form
These form-free tracking methods are an effective way to engage, personalize, and convert demo visitors — without bogging them down:
- Outbound & Query Strings (mass outreach personalization)
- Demo Share Links (1:1 personalized follow-ups)
- Account-Based Engagement (location-based tracking and LinkedIn retargeting)
- Navattic JS x HubSpot Integration (capturing visitor data post-form submission.
- Query Strings (track prospects’ behavior).
Option #1: Query Strings for mass outbound
Best for: Mass outbound outreach
Today’s buyers want to be confident that you know who they are and why they might want to purchase from you.
To stand out in outbound, try personalizing your email sequences.
And with Navattic’s personalization variables, you can customize interactive demos for every potential customer on your email list.
Here’s how to get started:
1. Find out which variables your email platform uses
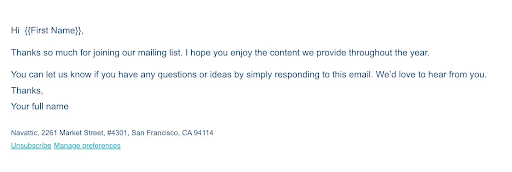
Figure out variables for attributes like “Name,” “Company Name,” or “Title.” Typically, variables show up like this: {variable} or like this: {{variable}}.
In HubSpot, variables are denoted by double brackets:
You can use email variables with tools like Outreach, Salesloft, Apollo, or virtually any other email tool.
2. Use those variables to customize interactive demos dynamically
Then, use personalization variables to insert them in a templated interactive demo.
This is what it would look like if you wanted to greet the recipient by their first name and reference their company name in your demo:
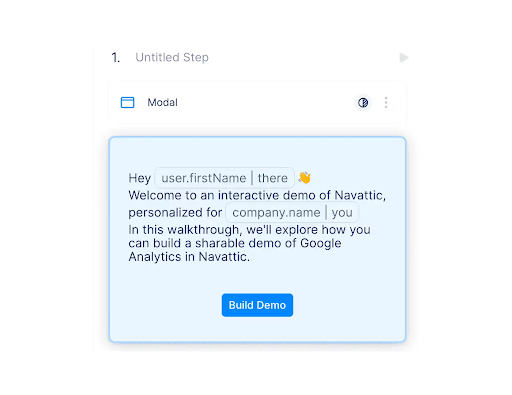
You can also add placeholders in case your email marketing platform is missing some data.
In this example, the email will start with “Hey there” if there’s no first name associated with a particular user.
2 Bonus features
- Automatically pull in company logos from the company domain.
- Personalize the rep’s calendar link. An optional additional step is to personalize the CTA of the demo with different calendar links.
By personalizing your calendar link, you can make sure different prospects get routed to the proper AE for a conversation.
Option #2: Demo Share Links for active prospects
Best for: Personalized 1-to-1 demos
Maybe your sales team has already chatted with a prospect and knows their email address.
After the call, they may want to send a follow-up interactive demo of a feature that a potential customer was interested in using demo share links.
Demo share links allow reps to customize the demos they send by manually adding prospect details (name, company name, role) at various predetermined points in the demo.
All the reps have to do is:
- Visit your Product Demo.
- Go to “Share Links” → “Create Link” → “Identification & Personalization.”
- Add identification tokens to track individual visitors.
Alternatively, suppose you have several sets of demo templates that fit a specific persona or use case. In that case, reps can swap in specific prospect names and logos with Navattic’s Find and Replace feature.
Here’s how:
- Go to the Navattic Capture Editor → “Magic Editors.”
- Select “Find and Replace.”
- Change company names and logos.
- Toggle “Global” on to apply changes across all Captures in your demo collection.
2 Bonus features
- Navattic checklists. Checklists make it easier for prospects to understand what functionality they’re seeing, and they don’t waste prospects’ time — folks can jump directly to the areas of the product they want to see first.
- Navattic Launchpad. Launchpad has several identification-related features that help your AEs and SEs push potential customers toward conversion. For example, they can:
- Share demos with prospects and track their behavior in real time from Navattic’s Chrome Extension.
- Offer in-demo sharing capabilities to encourage prospects to share demos internally (and track what additional stakeholders do). That data can help inform and customize future live demos or sales conversations.
- Send activity back to your CRM to tie demo usage directly to in-flight opportunities.
Option #3: Account-Based Engagement
Best for: Prospecting or LinkedIn Ads
Even without a form, Navattic tracks demo engagement at the account level. Here’s how to find out who is visiting your demos:
- Head to Navattic’s Account-Based Engagement dashboard.
- Click into an account and scroll down to the Anonymous Visitors section.
- Click into a visitor.
- You should see the visitor’s city and state under their anonymous ID.
- You can also go to “Attributes” → “Other” to see any additional identifying information Navattic picked up, such as “Seniority.”
Then, from within the account view, go to the Prospector tab. Prospector will help you find relevant contacts to reach out to by role at the account.
2 Bonus features
- Playbooks. Use Navattic’s Account-Based Engagement and Playbooks to send accounts to your Slack, email, or CRM to alert your team.
- Hubspot integration for LinkedIn retargeting. Read more about how to drive further engagement with demo visitors in our Interactive Demo Accounts for LinkedIn Retargeting blog.
Option #4: Navattic JS for HubSpot Integration
Best for: Tracking website visitors who fill out forms later
If a visitor engages with an ungated demo and later fills out a HubSpot form, Navattic syncs their activity.
Here’s how it works:
- Install the Navattic JS on your site.
- Navattic captures HubSpot cookies and links demo activity to HubSpot profiles. Once they fill out a form, you’ll see their demo activity inside HubSpot.
- From there, you can set up a HubSpot Dashboard Report to see demo views, step views, conversions, and the number of Contacts created by each demo.
Check out this interactive demo for a deeper dive.
Option #5: Query strings for prospect or customer activity
Best for: Tracking prospect’s behavior
Navattic Query Strings can help you monitor a specific prospect’s behavior by adding attributes to the end of a demo share link.
Here’s how to implement them:
- Pull up a Navattic demo share link.
- Figure out what attribute you want to track (full name, email, company name) and how those variables are listed in your CRM. For step-by-step instructions, scroll back up to Option #1, step 1.
- Then, add that attribute to the end of the demo link using this format: navattic-demo-link?attribute=value
- Example: Say you wanted to track Jane Doe’s behavior. Your link would look like this: https://training.navattic.com/rd3v0zhg?user.email=jane.doe@navattic.com
- Add additional attributes using this format: navattic-demo-link?user.email=value&user.fullName=value&company.name=value
- Example: Here’s the URL of a demo that references a company’s domain, a user’s first and last names, and the company they work for: https://capture.navattic.com/cl8a8zz4j3300709js91gpy7pk?g=cl89bcxfz3956309jth6qtmmxi&s=0&company.domain={{domain}}&user.firstName={{first_name}}&user.lastName={{last_name}}&cmpany.name={{company}}
You can also use Query Strings to see which of your existing customers is most engaged with the onboarding material in your learning management software (LMS).
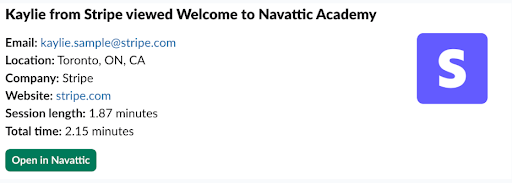
At Navattic, we recently launched Navattic Academy to support customers with asynchronous learning. Our CSMs wanted to know which customers had started taking courses, so we used Thinkific + Navattic Query Strings to send Slack updates to our CSMs.
Here’s how it works:
- We added ?user.email={{email}} to send Thinkific's email variable to Navattic.
- This allows CSMs to see which demos students viewed and how much time they spent on each one.
- We set up two playbooks to notify CSMs in a dedicated Slack channel. One for engaged (high confidence) accounts, and the other for visitors who made it past three steps in a demo.

3. CSMs saw exactly which customers engaged with promotional material and reached out 1:1 to congratulate the ones who enrolled in early-access courses.
Try building and deploying your first ungated demo for free.
Turn demos into deals.
Build interactive product demos that engage buyers and close deals faster.