How to Organize Demos in Your Navattic Workspace

There’s a trend we’ve noticed with our customers: when their first interactive demo goes live, other teams take notice.
Suddenly, the sales team, customer success team, even product folks want to hop on the interactive demo train.
While the enthusiasm is great, it does make managing demos more complex. Without a clear structure, outdated content, duplicate demos, and inconsistent messaging can creep in. And the bigger your library gets, the tougher it is to manage.
A well-organized Navattic workspace, one that’s aligned to your company’s teams, regions, or product lines, helps keep everything consistent and easy to find.
Below, we share how leading enterprise customers have set up their Navattic workspaces for maximum efficiency and oversight. But first, let’s talk a bit more about what a workspace is.
The Foundation: Structuring Your Navattic Workspace
When we say “workspace,” we mean a central hub for creating, managing, and sharing interactive demos.
As more and more people use Navattic, a thoughtfully designed home base becomes critical. Without it, duplicate demos start to appear, and small variations of the same Flow make it confusing which versions are accurate.
Looking across our customer base, the most effective setups have a few things in common:
A logical Board structure. Boards let you group demos for a specific purpose and/or team. For example, you might create an “Outbound demos” Board and add 4 to 5 top-performing demos relevant to your sales team.
Note: We suggest creating only a few boards to start to keep things simple, but you can create any number of boards in Launchpad.
Defined team access and ownership. When a new team joins your workspace, you can assign certain people as managers (who can manage team settings and members) and others as members (who are participants with access to team resources). Keeping those permissions separate prevents accidental changes and helps each group manage its own content.
Standardized tagging across demos. Labels make it really easy for people to search and filter for demos based on audience, product, or use case. Intuitive naming conventions like “Product [INSERT NAME]” for product line, “SMB,” “MM,” and “Enterprise” for customer type, or “Prospecting”, “Qualification”, and “Proposal” for sales stage go a long way toward keeping your demo library streamlined as it grows.
Demo Defaults to make sure all your demos are on-brand. Defaults automatically apply workspace-level settings (think supported languages, themes, logos, search engine indexing preferences) to new demos. This both saves time and ensures every demo looks like someone from your company made it.
Two Proven Ways to Organize Demos
Option 1: Organize by Team Function
Best for: Companies where multiple GTM teams use interactive demos differently.
Marketing may use them for your website’s homepage, sales may send them ahead of or after live demos, customer success may send them in onboarding email sequences or as a deeper dive into a specific feature.
Grouping them by function helps people find the content they need without digging.
The structure would look like this:
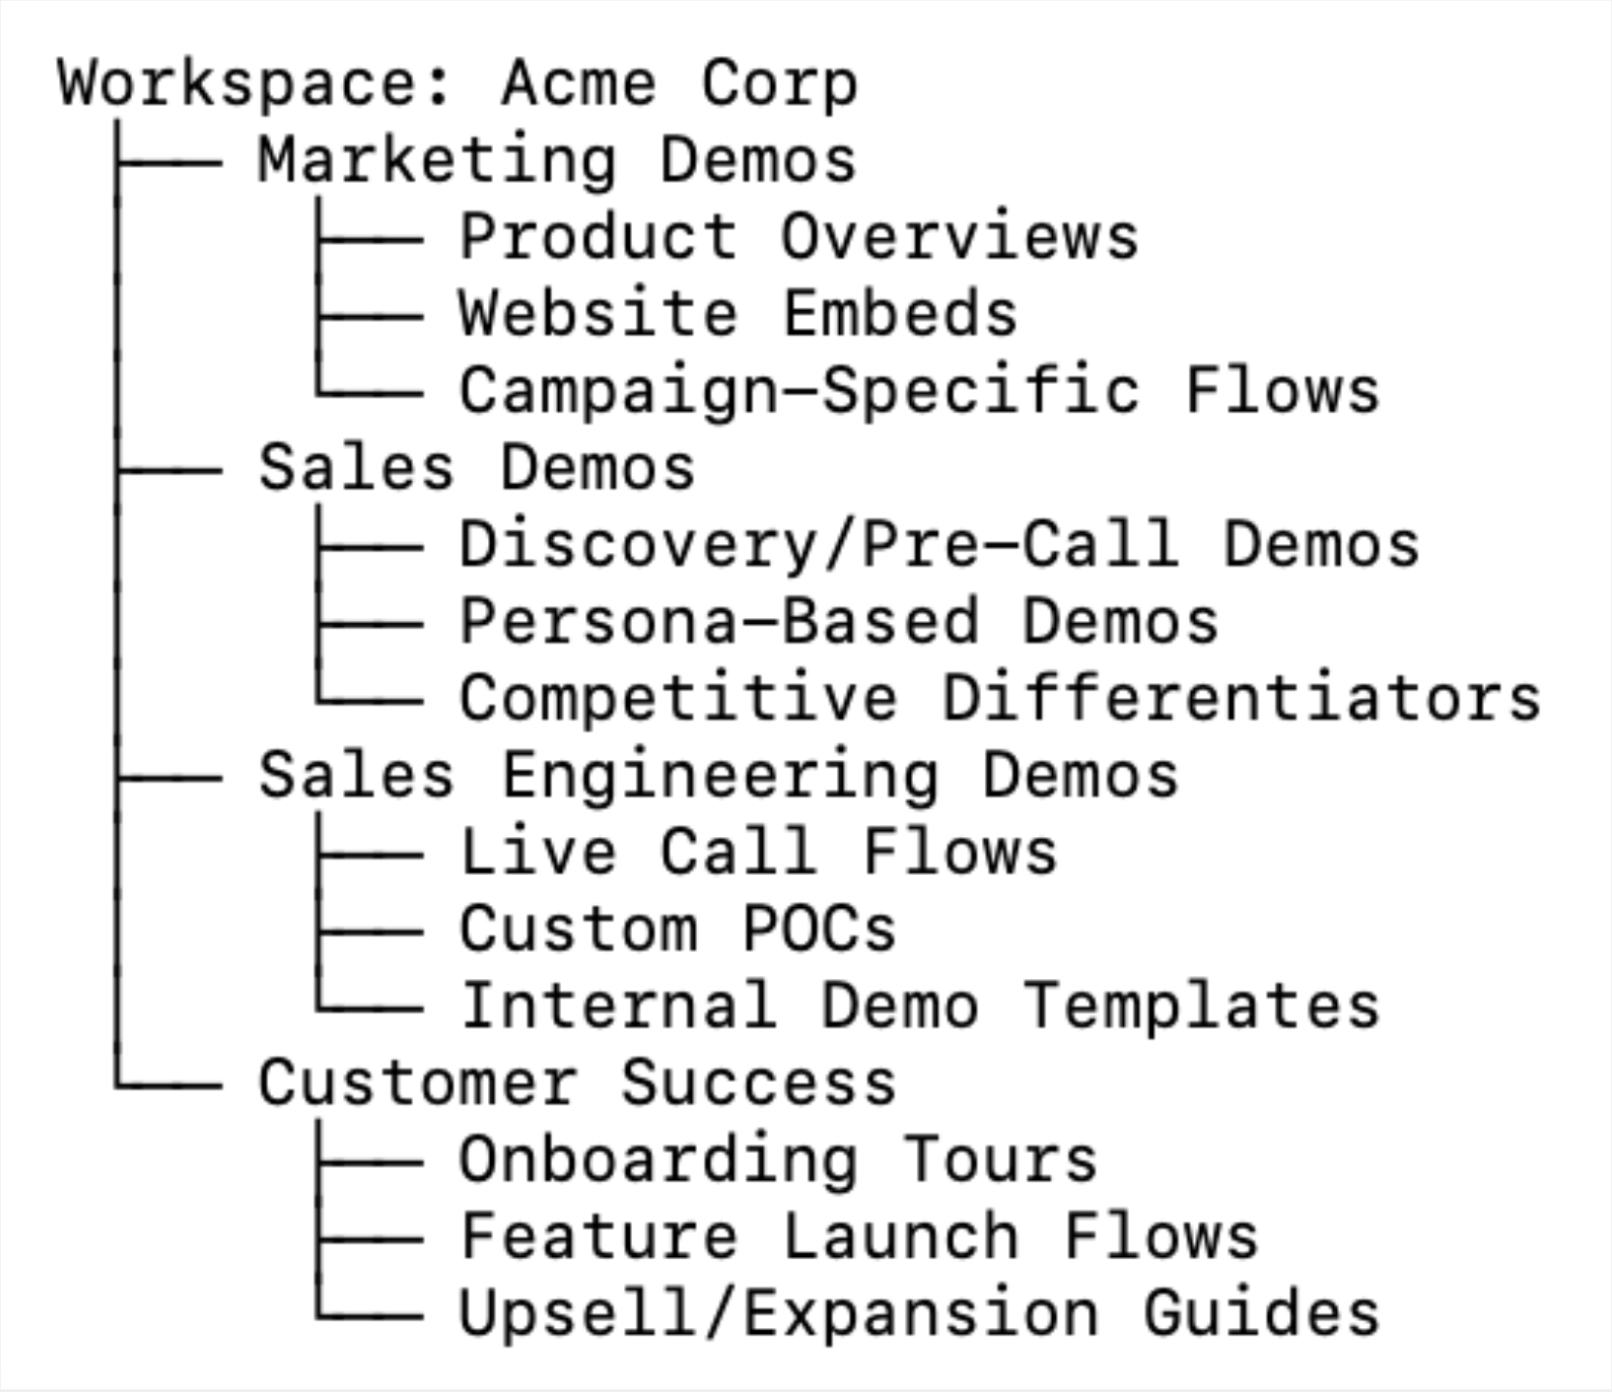
Advantages
- Mirrors team workflows and access needs.
- Makes permissions simple – marketing can edit public embeds, and SEs can manage technical flows.
- Ideal for large GTM orgs where messaging and depth vary by function.
Pro Tips
- Use Navattic boards to group demos by use case (e.g., “Marketing Demos” or “Sales Engineering Demos”).
- Tag demos with team ownership in the title (e.g., Marketing Demos | Product Overviews).
- Assign workspace admins for each department to maintain naming standards and analytics visibility.
Option 2: Organize by Product Line or Solution Area
Best for: Companies with multiple products or multiple modules within their product.
The structure would look like this:
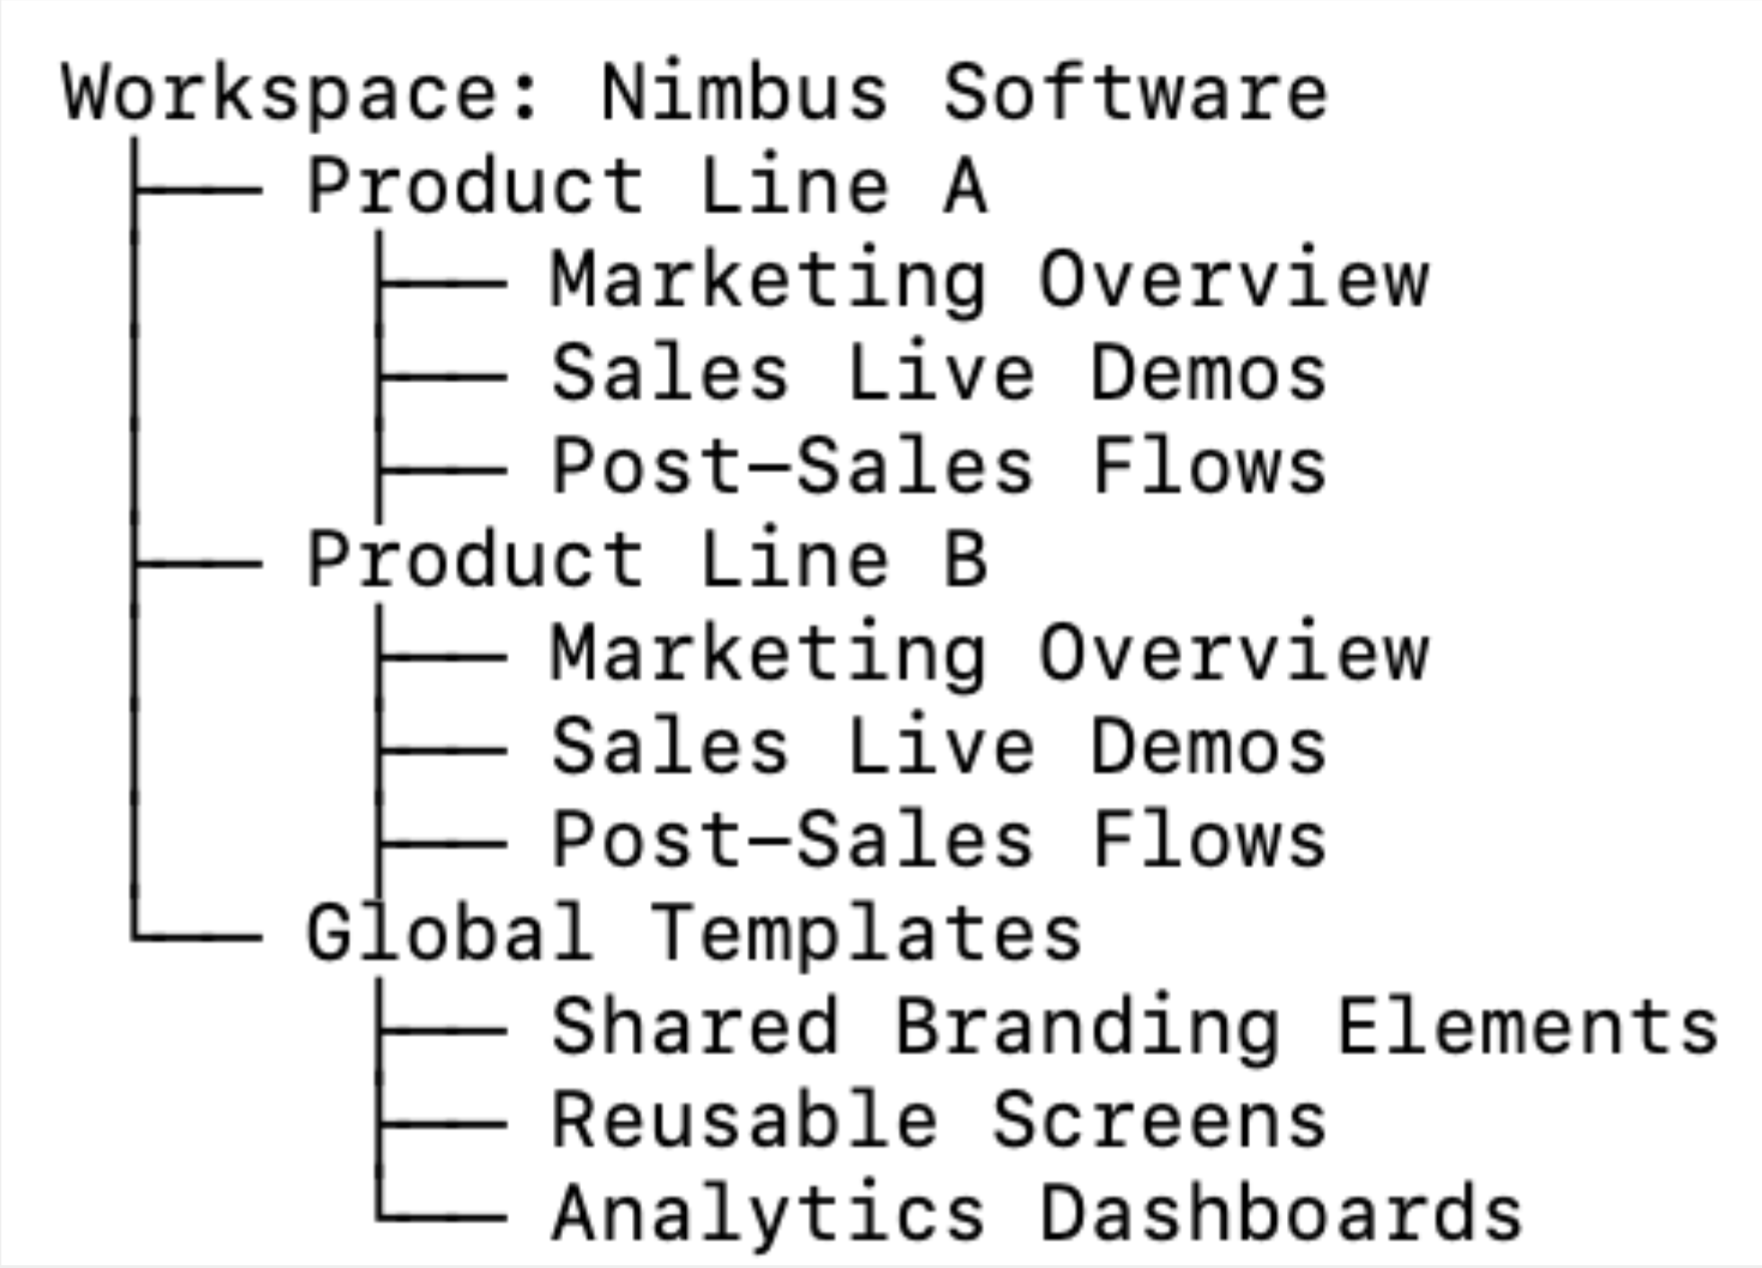
Advantages
- Keeps each product or product feature’s demo content self-contained.
- Ideal for organizations with specialized presales teams who focus on a particular product, or even a particular industry.
- Simplifies analytics tracking and reporting by product line.
Pro Tips
- Create a “Global Templates” board for a templated re-usable base demo.
- Leverage workspace-level analytics to measure unique visitors, time spent, and engagement by product.
- Use Labels like [Product] | [Use Case] | [Owner] for searchability.
- Large orgs can host their own custom domain for each major product line, and directly tie visitor activity back to their CRM (certain integrations, like HubSpot Tracking Script, require it).
Keeping Demos Consistent and Up to Date
Over time, maintaining demo quality and accuracy becomes just as important as creating new content.
Here’s a 5-step process to keep your demos clean and current:
- Assign demo owners. We’ve already mentioned this, but it’s worth noting again. There should be one person in charge of updates and access.
- Set a review cadence. Schedule them close to your release cycle so that you can immediately update old Captures to fit any new UI or messaging changes.
- Implement version naming, like “v1.2” or “Q3 Refresh.” This can help users figure out what demos were built for and when – and update or archive as necessary.
- Archive old flows. That way, your workspace stays fresh and searchable.
- Identify underperforming demos. In Navattic Analytics, you can see which ones are getting the most attention. Use that to figure out what’s going well (maybe it’s the demo storyline, the copy, the Captures), and apply that to other demos that have lower engagement.
Pro Tip: Create a “Staging” Board where teams can test out new demos before publishing live.
This gives everyone a chance to give feedback and allows demo owners to make changes prior to sharing with a customer or prospect.
Want more tips and best practices? Read Your Interactive Demo is Live. What’s Next?
Real-World Examples: How Enterprise Teams Stay Organized
At Remote, a global payroll, tax, HR, and compliance solution for distributed teams, the product marketing team created a comprehensive go-to-market template to keep demos current.
“Our checklist kicks in with each new feature, benefit, or product launch, and includes tasks like social media posts, email updates, and website revisions. Now, it also prompts us to update or create a new Navattic demo.”
Not only does this process ensure they don’t overlook refreshing demos, it also allows them to maintain their demos without involving other teams, such as video editing.
“This autonomy in product marketing to make updates directly is incredibly efficient.”
Read about their strategy in detail here.
The product marketing team at CaptivateIQ, has its own method of keeping pace with rapid product updates.
Per Quintin Smith, their Product Marketing Lead, “We faced a common challenge for fast-growing startups: our product was evolving rapidly, making our interactive demos quickly outdated. This created inconsistent product experiences across the funnel.”
So, he came up with a solution:
- For Tier 1 product launches (major features requiring full marketing, sales, customer, and internal enablement) → The team would create dedicated product tours.
- For Tier 2 product launches (important updates needing sales, customer, and internal enablement without dedicated marketing) → The team would update evergreen overview tours.
- For Tier 3 feature launches (minor updates only requiring customer and internal communications) → The team would make light or no demo updates.
Then, he distributed demos strategically across channels.
The evergreen tours would go on G2, in nurture emails, and on core website pages, whereas the more feature-specific tours would go in launch emails, sales enablement, and outreach templates.
Read about his strategy in detail here.
Quick Reference: Naming and Permissions Checklist
Recommended naming convention: [Team or Product] | [Demo Name] | [Quarter/Version]
Permission settings:
- Marketing → Editor access for public demos
- Sales/SE → Editor access for private, persona-specific demos
- CS → Viewer or Editor for onboarding demos
- Admins → Full access for governance and analytics
Review cadence:
- Monthly board reviews for fast-changing demos
- Quarterly workspace audits for large orgs
Advanced Setup: Launchpad for Sales Teams
If you’ve already got your Navattic workspace set up, but you’re trying to make your demos more accessible to sellers, consider using Launchpad.
We built it specifically to give sellers access to demos without needing to bug their SEs or log into the builder themselves.
How Launchpad works:
SEs pre-build modular demos for certain features, use cases, segments of your ICP, region, or industry, and make them available to reps through Launchpad.
From there, all AEs have to do is:
- Search for a type of demo in the Navattic Chrome Extension.
- Select the company they are going to send it to (Navattic will automatically tie the prospects’ interests and demo activity to the opportunity in your CRM).
- Customize the generic demo with pre-made interest areas. If they want, they can even add a personal welcome video to introduce themselves.
- Send a link to the prospect.
On the backend, you can use Launchpad’s built-in Rep Activity tracking to see which reps are sending out the most demos and which demos are the most popular among prospects.
If one SDR or rep is seeing a lot of engagement on their demos, others on the team can learn from the way they’re personalizing their outreach.
Explore Launchpad in our interactive demo.
Launchpad is the easiest way to keep your demos organized and accessible.
Give it a try or book a demo to walk through it live.
Turn demos into deals.
Build interactive product demos that engage buyers and close deals faster.