Form Strategies for Interactive Demos: How to Capture Leads and Personalize Experiences with Navattic

While Forms are often seen as a friction point, they can also help with:
- Who is going through your interactive demos
- What those people care about
- Whether they are qualified leads
- How to tailor future demos to prospects’ specific use cases
Below, we walk you through how to use Navattic Forms to achieve common sales and marketing goals, with real tips and examples from our in-house Training Lead, Emily Baranik.
Goal 1: Capture Qualified Leads From Your Demo
Best Practice: Gate early, not late
We often think a Form has to be the very first or last step in a demo. But actually, Forms placed a few steps in perform better.
According to our 2025 State of the Interactive Demo Report, Forms placed in the middle have a 9.7% higher engagement rate than those at the very beginning.
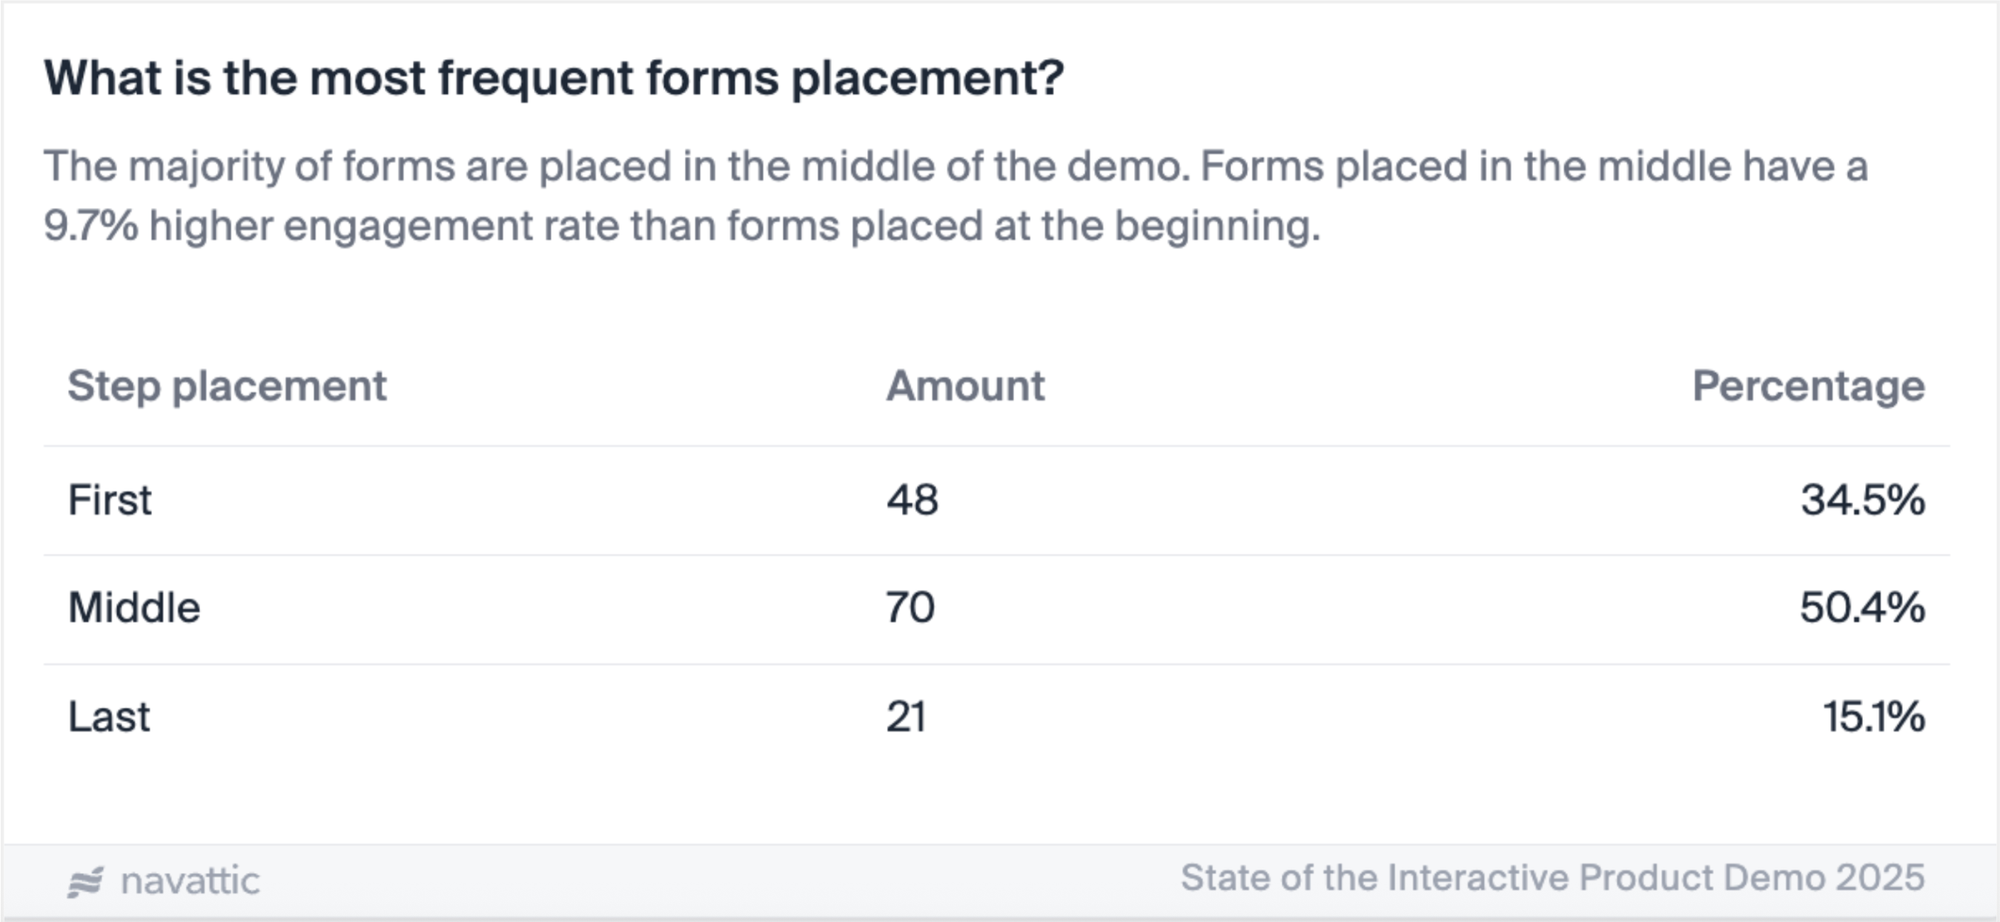
Plus, those who do make it to the middle are more likely to be engaged visitors.
With that in mind, our biggest tips are to place your Form:
- Within the first 5 steps of your demo. This is where the majority of engaged visitors spend their time.
- After a high-impact Capture. Something people really want to see more of (and wouldn’t see on your website or other materials). They need to be willing to share their information to get a sneak peek.
How to do this in Navattic
- Add a Form step within the first 3 to 5 steps of your Flow.
- Go to Flow Builder > Add a Step > select the Form step type > Select a Form from the dropdown.
- Use a headline like: “See the full platform in under 5 minutes.”
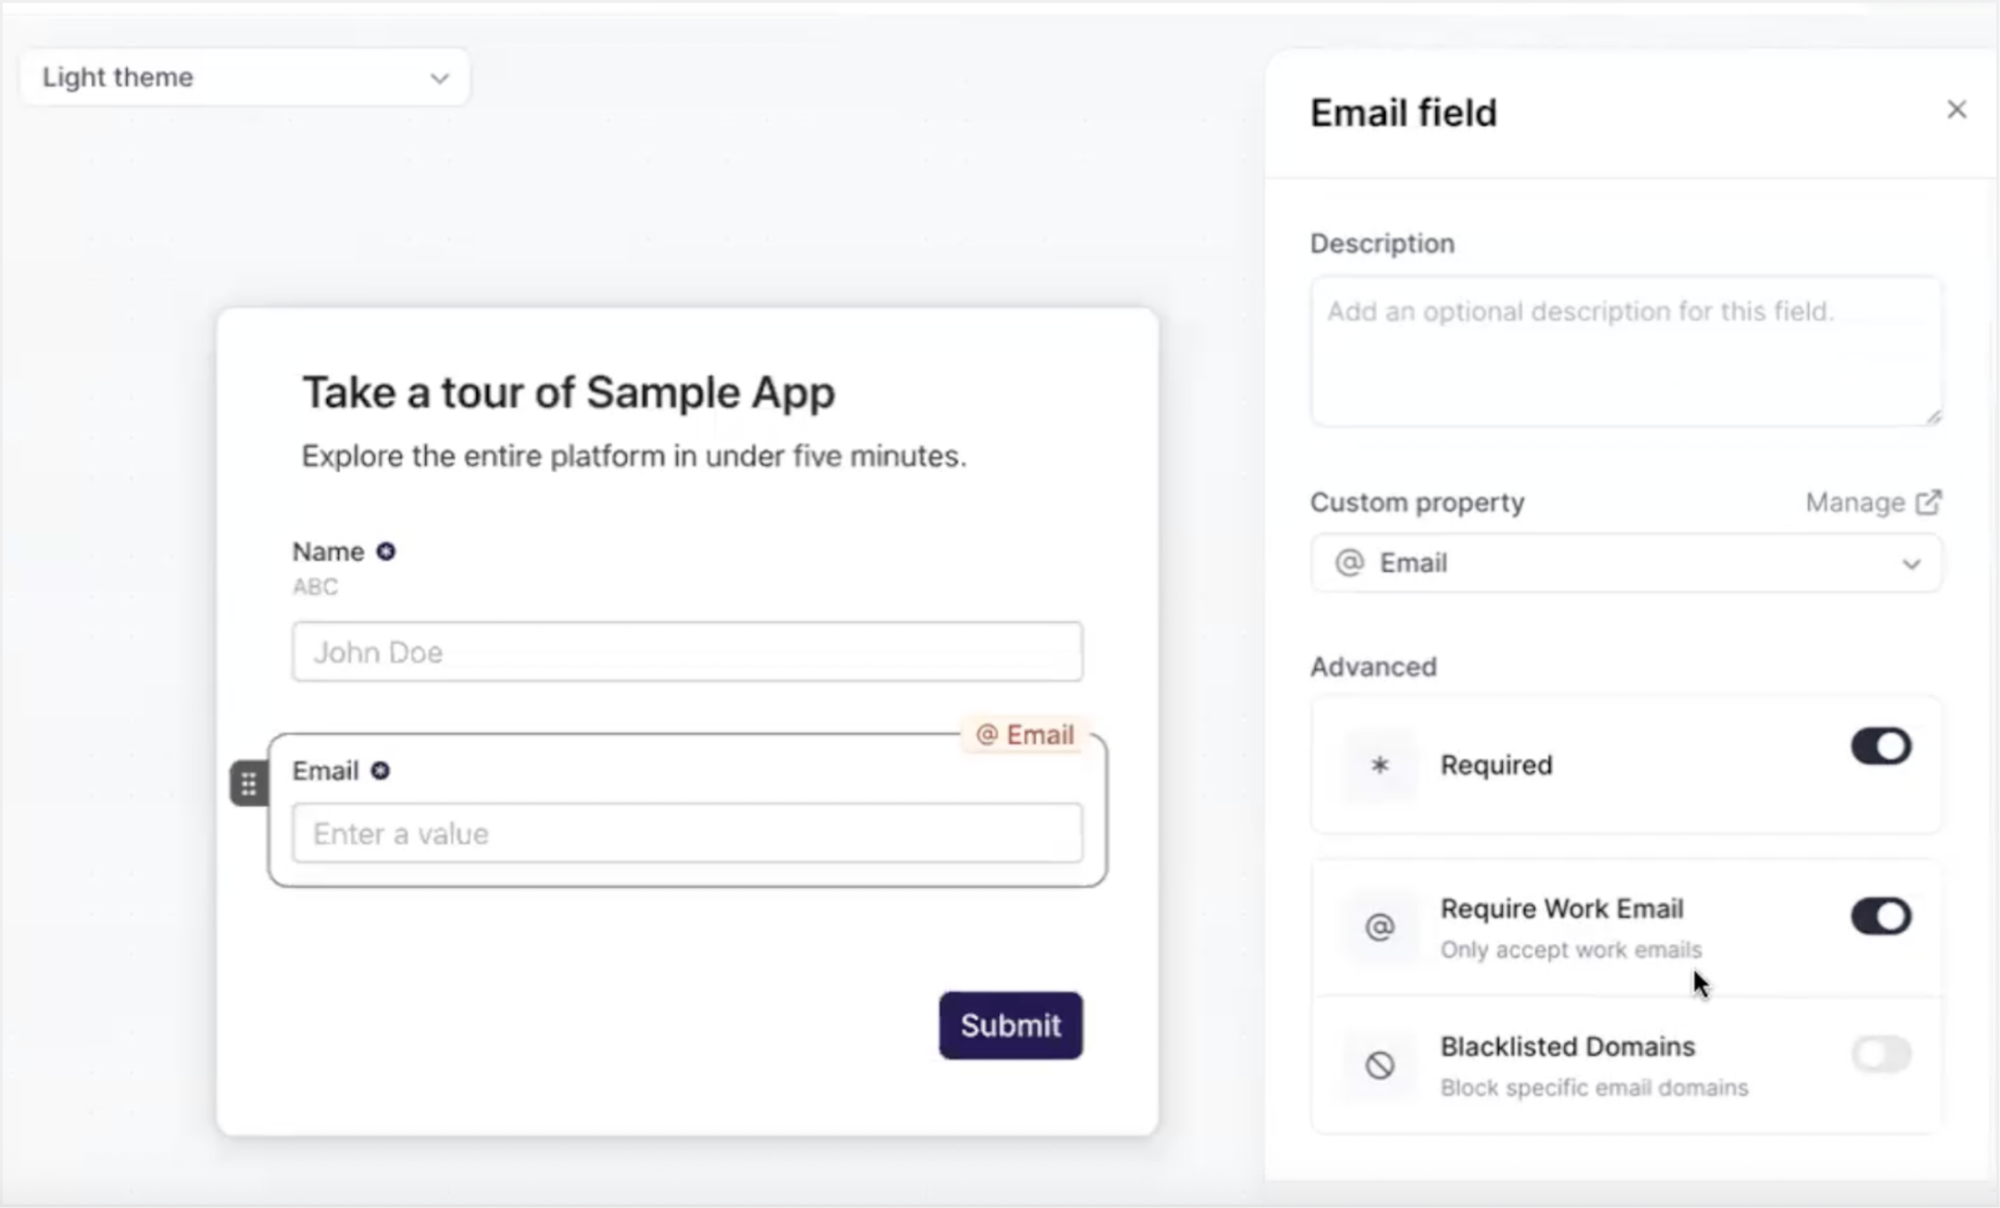
Goal 2: Reduce Friction While Still Capturing Data
Best Practice: Keep your Forms short and strategic
According to our data, top-performing demos have Forms that are just 1 or 2 fields. Add any more than that, and you risk visitors bouncing off the page.

We recommend adding two fields to your Forms: Name and Work Email. This keeps it simple and low-effort for your visitors.
Keep in mind that if your demo is embedded on a website that also uses a Pardot, HubSpot Marketing Hub, or Marketo form, you can use Navattic JS to help identify and enrich your visitors.
And if you’re using Navattic’s Account-Based Engagement, company information will be pulled in automatically, so you don’t need to ask for it on your Form.
Sending data to HubSpot? Here are the most popular ways to use it.
How to do this in Navattic
- Use the default Form fields, Full Name and Email.
- In the Email field, toggle on “Require Work Email”*. This helps you focus on real potential buyers versus those who may be more casual browsers.
*Only available on Navattic Growth or Enterprise plans
3. Go to Settings > select “Skip if already submitted” to let repeat visitors (i.e., potentially high-value prospects) bypass Forms.
Goal 3: Protect Demo Content From Competitors
Best Practice: Block known domains
While making your product usable and accessible are key parts of catering to the modern buyer, you may not want everyone to be able to see your latest features.
On our Growth Plan, you can block certain domains from accessing your demos. That way, you can make sure that your demo content stays in the hands of actual prospects, not your competition.
How to do this in Navattic
- Go to your Form settings > Email field > toggle on “Blacklisted Domains”*.
- Enter competitor domains to stop external sales teams or product marketers from accessing your demo.
- Test the experience with an internal address (e.g., navattic.com) to make sure the blocking function works.
*Only available on Navattic Growth or Enterprise plans
Goal 4: Personalize the Demo Journey
Best Practice: Use Form inputs to route Flows
You want each prospect’s interaction with your product to be as personalized and relevant as possible. But it’s hard to know what they’re looking for just from their name and email.
Instead of guessing, you can just ask them. In your form, include a dropdown or “What are you most interested in?” multiple-choice field.
Based on their selection, route them to a Flow that highlights a specific feature, use case, or role-based perspective.
How to do this in Navattic
- Create or edit a Form.
- Click Interest Areas to add it to your Form.
- Adjust the header and description, if needed. Defaults are “Tell us about your interests” and “This will personalize your demo with features you care about.”
- Add interest areas under Options. To add new interests, click “Select interest” > “Manage interests” > “New.”
- Toggle on “Required” to force users to choose one or more interests to submit the form.
- Go back to your Workspace > click Product Demos > Select the interest area that corresponds with each Flow.
- Click the “Checklist” tab to create a Checklist for the demo.
- Drag and drop to arrange them appropriately. Form gate should be at the top. You can also include a CTA button here if you would like.
Example: Packfiles
Packfiles is a company that builds products to help orgs adopt GitHub faster.
Their interactive demo starts with a “choose your own adventure”-style question, asking visitors what features they’d like to explore:
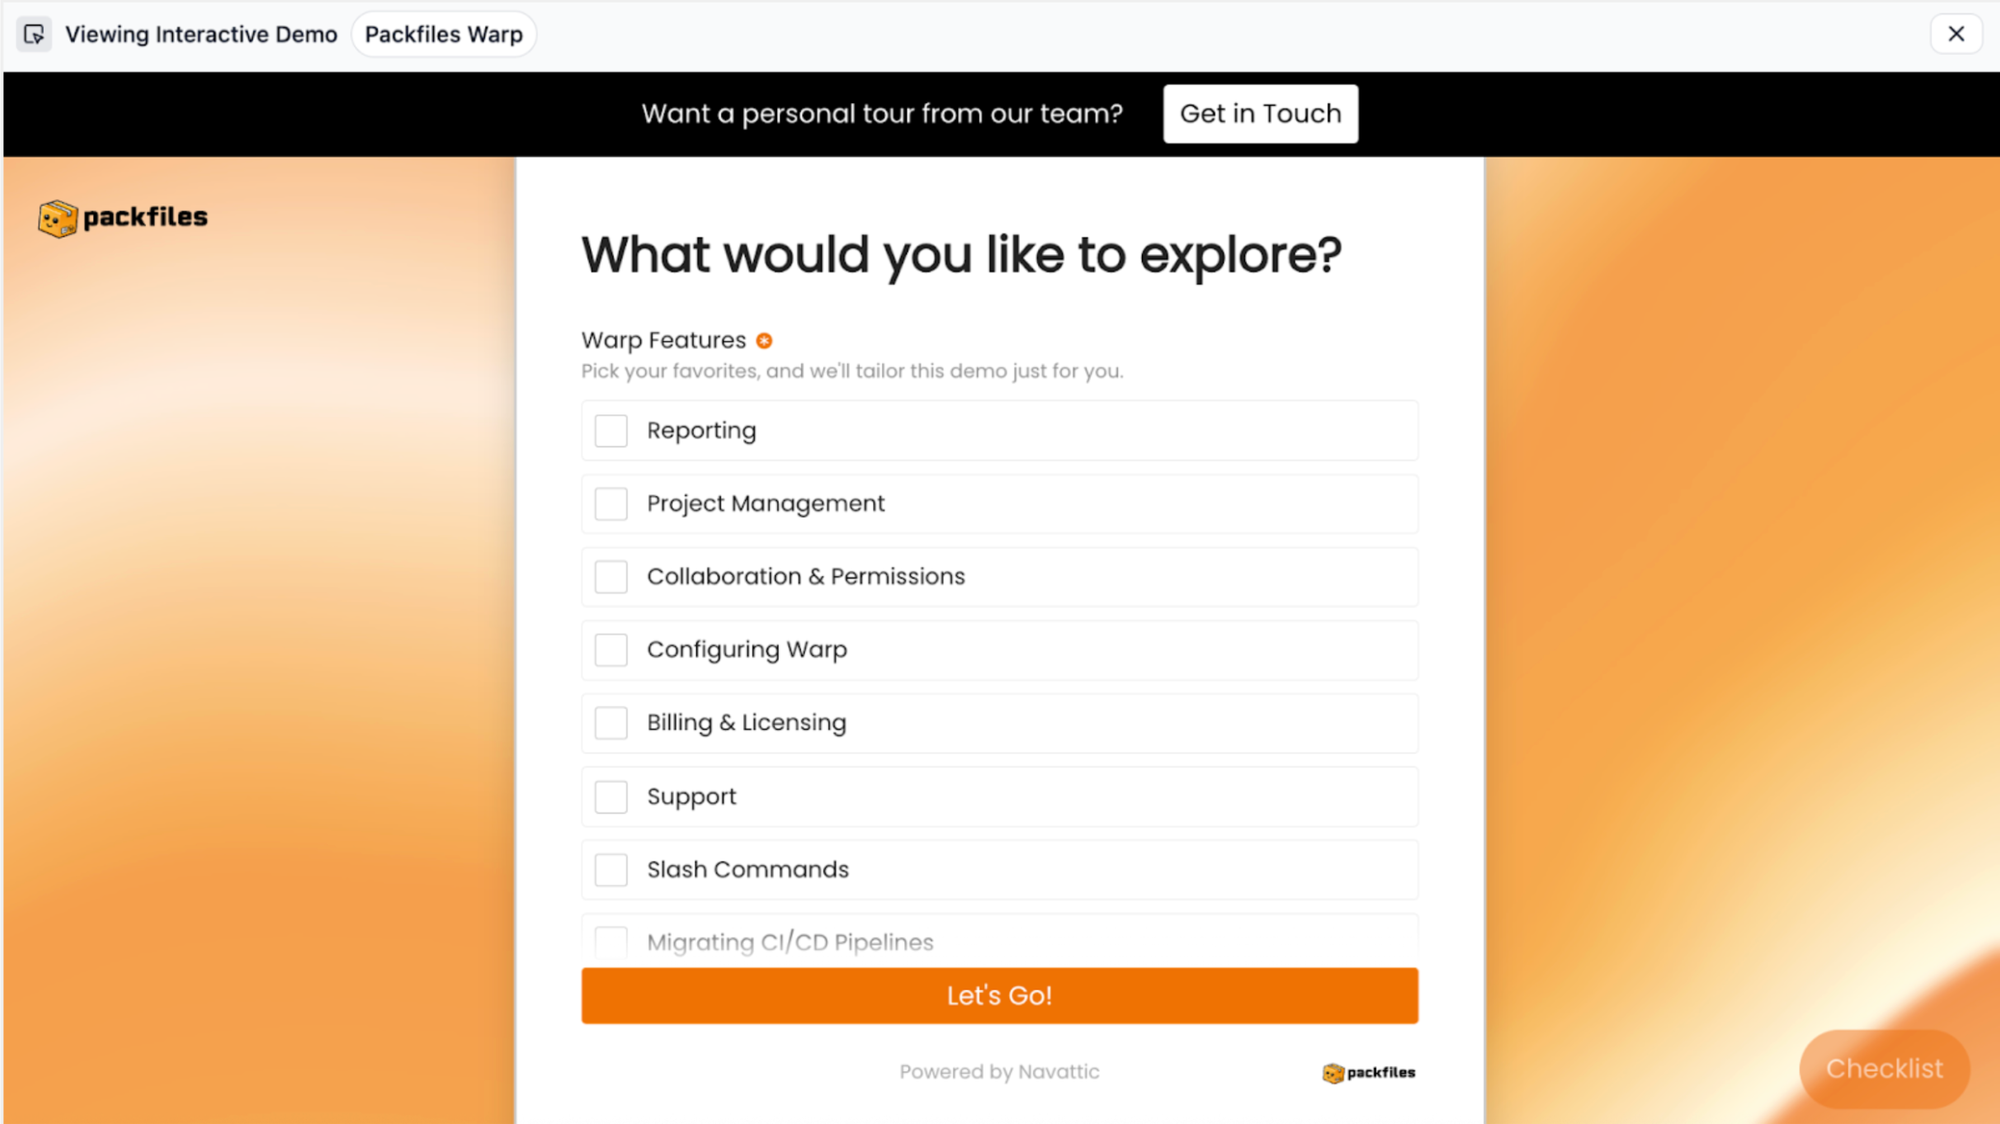
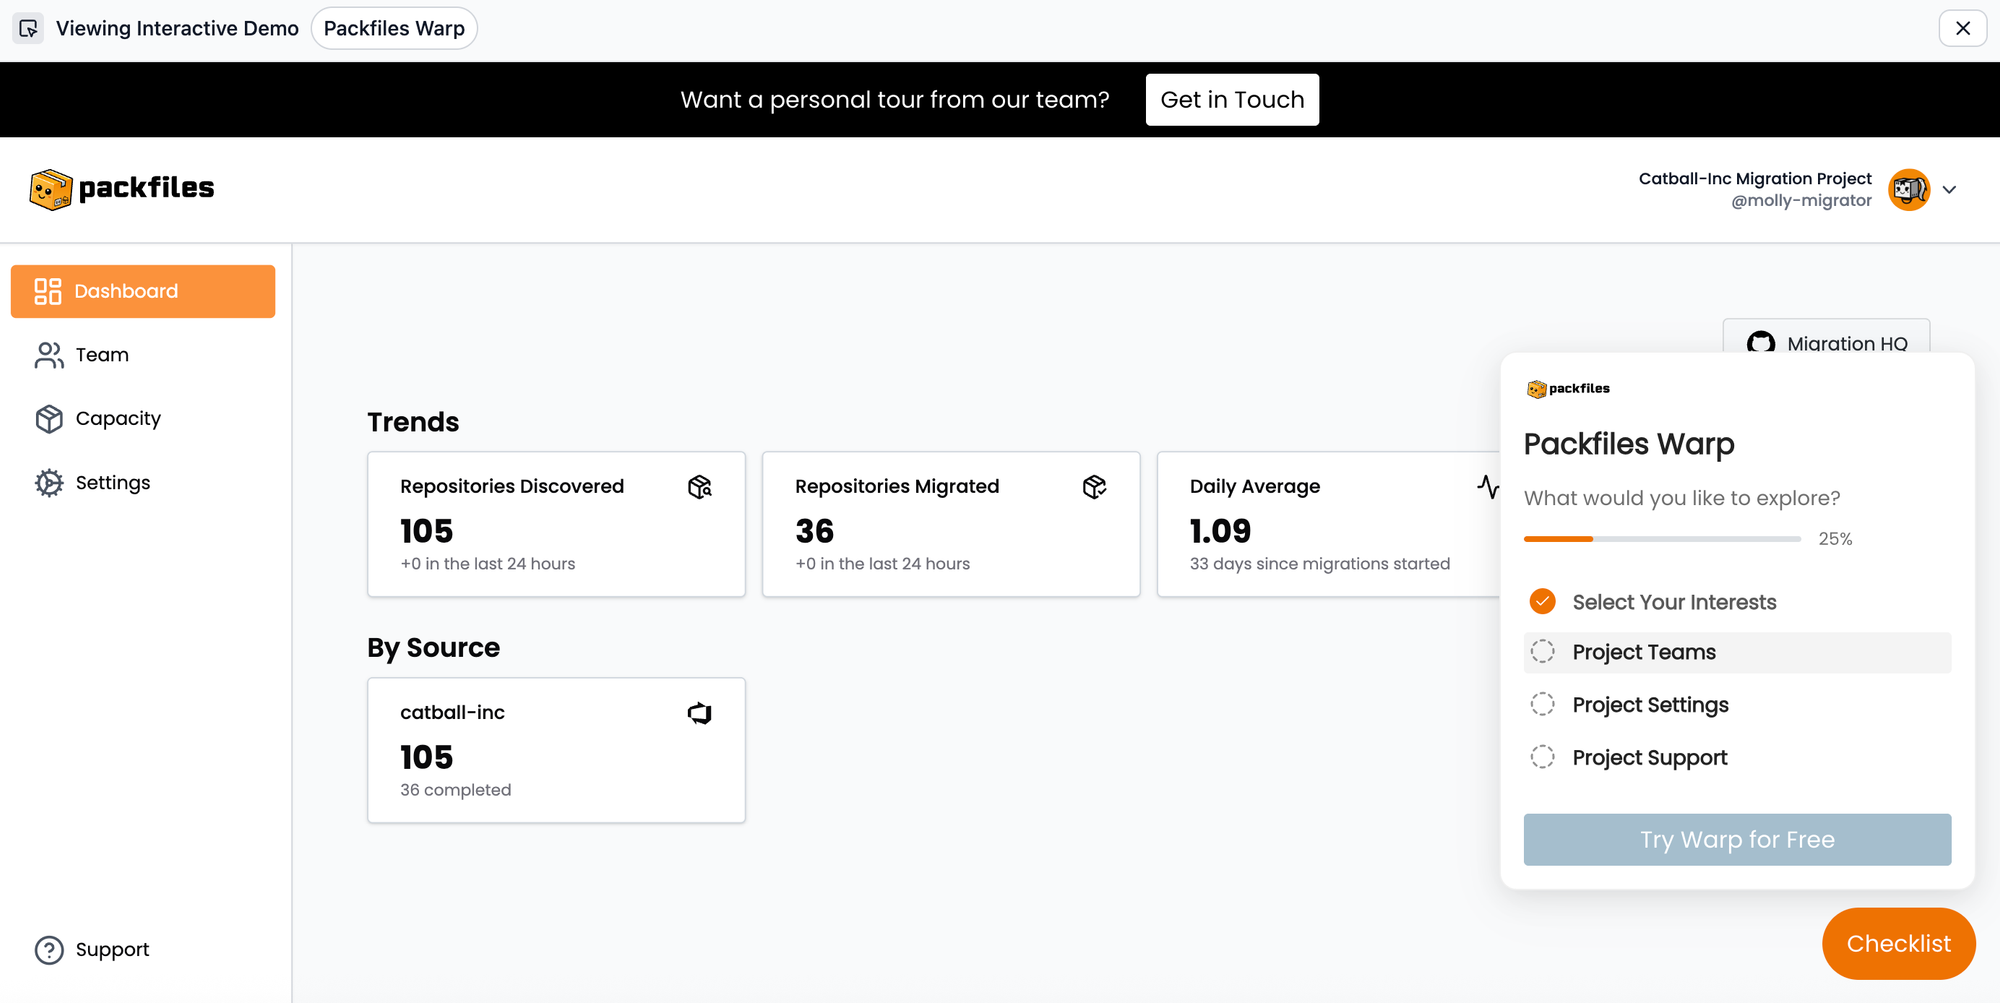
From there, the team serves up an interactive demo related to the first feature the visitor chose.
Visitors can also use a checklist on the right-hand side to navigate to other areas of interest at any point during the demo.
Personalization tip
If you’re sending demos directly to prospects, let them select their level of interest upfront via Navattic Launchpad.
That way, you have a better sense of their intent ahead of a live call and can adjust your talk track accordingly.
Learn more about Launchpad here.
Goal 5: Track Submissions and Buyer Intent
Best Practice: Take a deeper look at your buyer data
Once you start receiving submissions, Navattic tracks everything you need to keep visitors engaged:
- Name
- Company name and headquarters*
- Total time spent in the demo
- Demo steps they took
- How much time they spent on each step
- Number of visits
- Last visit timestamp
- Viewer location (at the city level)
- Device information
*Only available on Navattic Growth or Enterprise plans
To check that your Form is collecting data, open it and click the Submissions tab at the top. There, you’ll see a quick view of each visitor, including submission time and a pop-out tray to see detailed values.
For deeper insight – and to take action on the data you’ve collected – head to the Visitors section of your Workspace.
How to do this in Navattic
- Go to the Visitors area of your Workspace (under Leads).
- Click the Export button or set up a Playbook to send to Slack
- Send high-intent visitors (who spend a lot of time on your demo and match your ICP) to AEs.
Bonus Goal: Determining What Kinds of Demos Work Best
Best Practice: Run A/B tests on gated and ungated Flows
If you’re not sure what kinds of demos will drive the most engagement, you can test them yourself.
With Navattic’s A/B testing feature (on the Base Plan), you can see the difference in unique and engaged visitors between:
- Gated vs. ungated demos
- One use case over another
- Different aesthetic choices like CTA color, modal text, and step variations
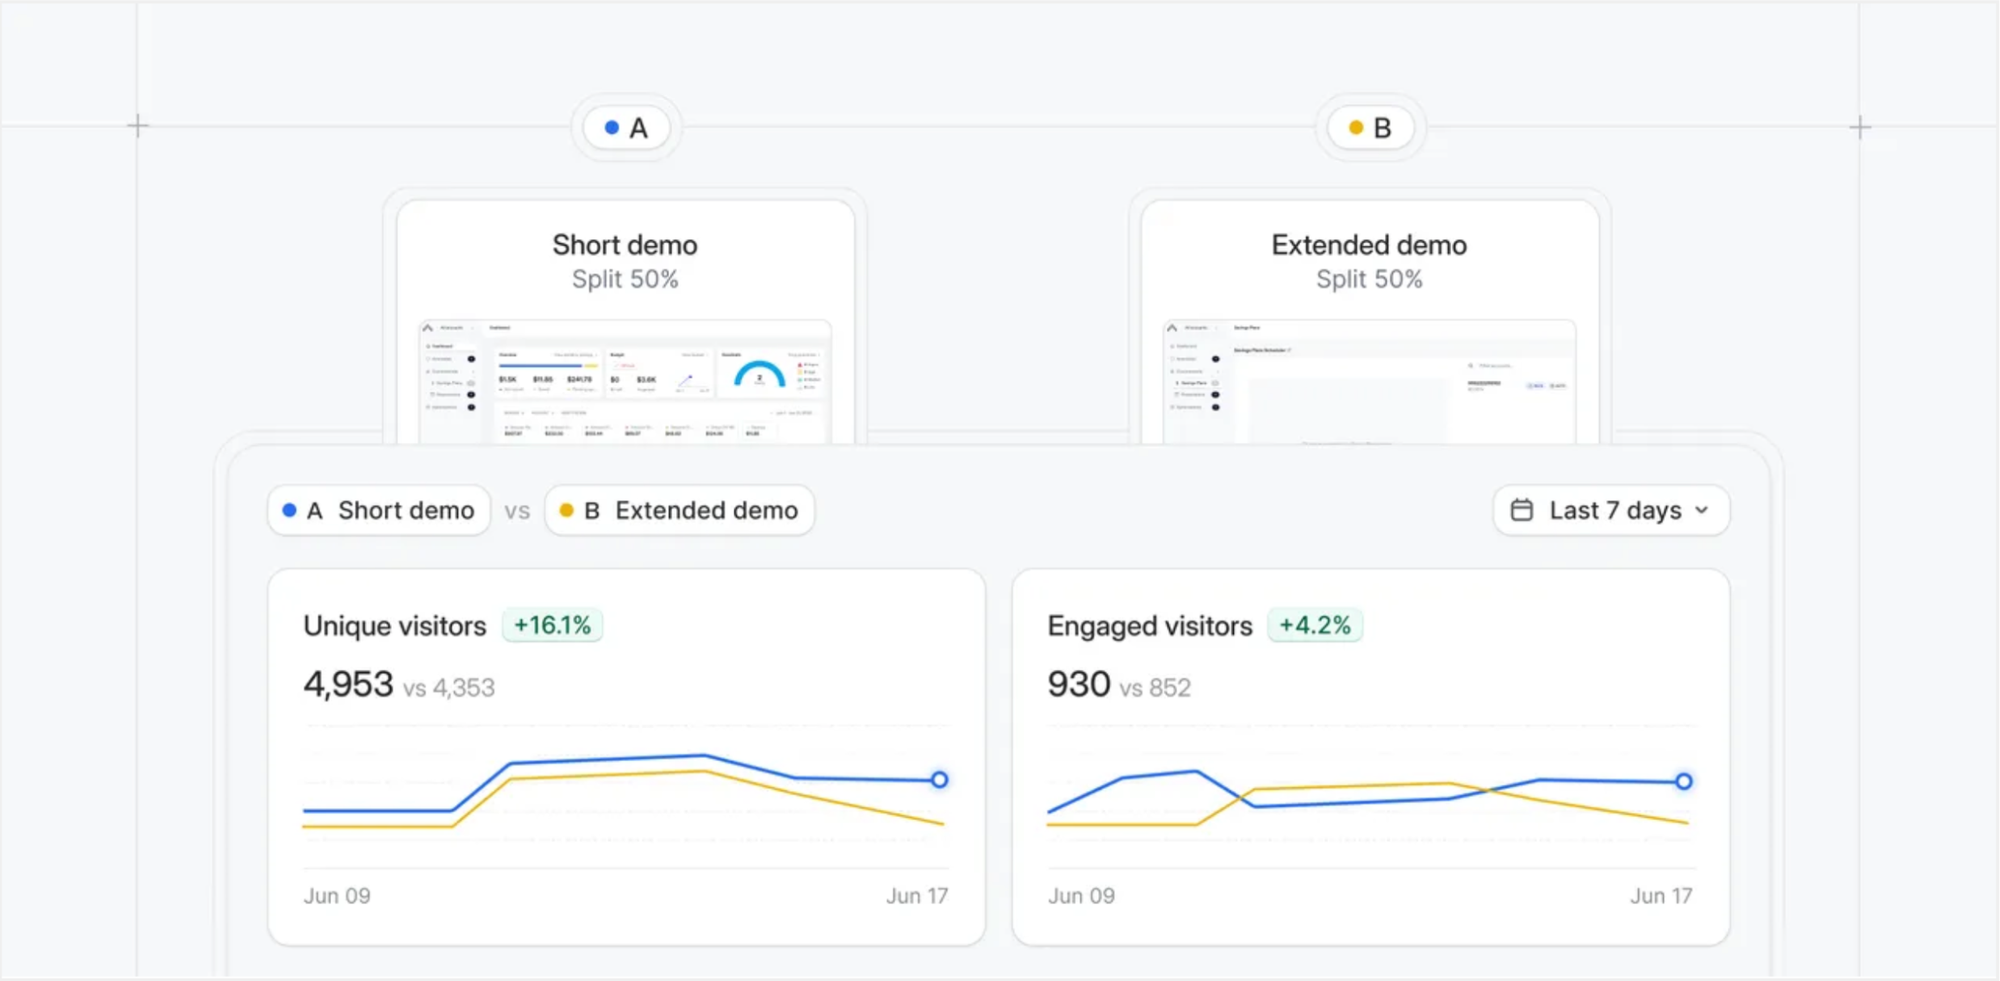
We recently ran our own A/B test to compare our current overview demo with an Interest Area demo that lets visitors choose whether they want to explore a sales, marketing, or product persona-based demo.
How to do this in Navattic
- Create two demo flows: one with a form gate, one without.
- Compare view rates, form fills, and drop-off points.
- Let data guide your future gate strategies.
Here’s an interactive demo that walks you through an A/B testing setup.
Want more targeted help with your Forms? Reach out to your CSM to set up a call.
Turn demos into deals.
Build interactive product demos that engage buyers and close deals faster.